Configuration management, application deployment, task automation, and IT orchestration are the main uses for the open-source automation tool Ansible. It is renowned for its cross-platform compatibility, agentless architecture, and ease of use. In this Ansible tutorial for beginners, you will learn core concepts, installation steps, and other important things. Explore our DevOps Ansible course syllabus.
Getting Started with DevOps Ansible
Ansible is a strong automation tool that makes job automation, application deployment, and configuration management easier. We will cover the following in this Ansible tutorial.
- Core Concepts of Ansible
- Installation and Setup Ansible
- Inventory Configuration
- Basic Ansible Playbook
- Running Ansible Playbook
- Key Modules of Ansible
- Variables and Roles of Ansible
- Ansible Best Practices
- Importance of Learning Ansible
Core Concepts of Ansible
Ansible is an open-source solution for IT automation that facilitates the configuration, management, and automation of IT infrastructure. DevOps uses it a lot.
Ansible helps guarantee system compliance and minimize downtime, simplifies the deployment and maintenance of systems and applications, streamlines and harmonizes application and infrastructure administration, and helps in incorporating apps created internally into programs.
Here are the advantages of Ansible:
- Agentless Architecture: Ansible does not require the managed servers to have agents installed. It communicates via WinRM or SSH.
- Simple and Intuitive: Its playbooks are written in YAML, which makes them easy to learn and human-readable.
- Strong: Able to automate intricate processes on several systems.
- Idempotent: To avoid unwanted changes, Ansible makes sure that a job is only carried out when necessary.
- Cross-Platform Support: Compatible with network devices, Windows, Linux, and more.
- Modular Design: It is easy to expand and has a large library of components.
Recommended: Ansible Online Training Program.
Ansible Core Concepts
Here are the core concepts of Ansible:
Control Node: The computer on which Ansible is installed and playbooks are executed.
Managed Nodes: The servers or gadgets you wish to control (targets).
Inventory: A file that groups and lists the nodes you administer.
- Identifies the target nodes or hosts that need to be controlled.
- Usually an INI-formatted file, but it can also be created dynamically.
Example:
[webservers]
web1.example.com
web2.example.com
[dbservers]
db1.example.com
db2.example.com
Playbooks: YAML files called playbooks specify the actions that must be taken on the managed nodes.
- YAML-formatted scripts for automation.
- It includes one or more plays, each of which specifies a collection of target hosts and duties.
Example:
– hosts: webservers
tasks:
– name: Ensure Apache is installed
apt:
name: apache2
state: present
Tasks: Specific operations carried out by Ansible.
- The playbook’s lowest unit of execution.
- A module with particular parameters is called by each task.
Example:
– name: Ensure Apache is running
service:
name: apache2
state: started
Modules: They are pre-written code segments that carry out particular functions.
- Ansible’s fundamental execution unit.
- Every module carries out a distinct function, such launching services, managing files, or installing software.
Common modules include apt, yum, copy, service, file, and so on.
Roles: A method for classifying and reusing playbooks and associated documents.
- Playbooks and tasks using a directory structure.
- It contains subdirectories for files, tasks, handlers, and templates.
- It encourages sharing and reusing.
Handler: Task-triggered events are frequently used for configuration reloads or service restarts.
Example:
– name: Restart Apache
service:
name: apache2
state: restarted
Review your skills with Ansible interview questions and answers.
Installation and Setup Ansible
We will install Ansible on a number of operating systems here, including Windows, MacOS, RHEL, Ubuntu, and CentOS.
Installing Ansible with pip
The installer for Python packages is called Pip. Pip, which is incredibly easy to use and install any other Python package using, may be used to install Ansible. Additionally, this guarantees the installation of all Python dependencies.
#Install python3 and pip on CentOS:
Sudo yum install epel-release
Sudo yum install python3-pip
#Install python3 and pip on RHEL:
sudo dnf install –assumeyes python3-pip
#Install python3 and pip on MacOS:
/bin/bash -c “$(curl -fsSL https://raw.githubusercontent.com/Homebrew/install/HEAD/install.sh)”
brew install python
#Install python3 and pip on Ubuntu:
sudo apt update
sudo apt install python3-pip
#Install python3 and pip on Windows:
Run the Python installer for Windows and select “Add Python 3.x to PATH”, this will ensure pip is callable from cmd.
#Validate you have python and pip installed:
Python3 —version
pip —version
#Install Ansible using pip:
pip install ansible
#Validate Ansible
Ansible —version
Installing Ansible on Ubuntu
Ubuntu installs apps using the APT package management. To install Ansible on any Ubuntu Linux computer, use the following commands:
sudo apt update && sudo apt upgrade -y
sudo apt install software-properties-common
sudo add-apt-repository –yes –update ppa:ansible/ansible
#Install Ansible
sudo apt install ansible -y
#Validate Ansible:
ansible —version
Installing Ansible on RHEL
Ansible is included in the software repository of Red Hat Enterprise Linux (RHEL), a subscription-based product that guarantees enterprise-level reliability and support.
To install Ansible on RHEL run:
sudo yum update -y
sudo dnf install -y ansible-core
#Validate Ansible:
ansible —version
Installing Ansible on CentOS
Ansible can be installed straight from the EPEL repository, and CentOS also makes use of the YUM package manager:
sudo yum update -y
sudo yum install epel-release
sudo yum install ansible
#Validate Ansible:
ansible —version
Installing Ansible on macOS
As MacOS has a built-in package management, all you need to do is execute the following command:
brew update
brew install ansible
#Validate Ansible:
ansible —version
Installing Ansible on Windows OS
When compared to all the Unix-like distributions, Windows is a little more complicated.
Step 1: To enable WSL (Windows Subsystem for Linux), launch Powershell as Administrator and do the following commands. Ubuntu will be installed as your Linux distribution by default.
wsl –install
Step 2: The following commands can be used to install a different Linux distribution:
#To view available distributions for Linux:
wsl —-list
wsl –install -d Debian
Step 3: You will be asked to establish a user account and password after installing the Linux distribution.
Step 4: Following this, your WSL Linux Box ought to be able to execute commands.
In this example, we installed Ansible by running the following commands after installing the Ubuntu Linux distribution:
sudo apt update && sudo apt upgrade -y
sudo apt install ansible -y
#Validate Ansible installation
ansible –version
Inventory Configuration
Start by creating an inventory file, such as inventory.ini. To the file, add your managed nodes:
[webservers]
web1 ansible_host=192.168.1.10
web2 ansible_host=192.168.1.11
[database]
db1 ansible_host=192.168.1.20
This can also be set in the inventory file if your distant computers use a different username or don’t utilize normal SSH ports.
web1 ansible_host=192.168.1.10 ansible_user=remoteuser ansible_port=2222
Basic Usage of Ansible
Check Host Connectivity: ansible all -m ping
Run Ad-Hoc Commands:
Example: Check disk space on all hosts.
ansible all -a “df -h”
Execute a Playbook:
ansible-playbook playbook.yml
Explore Ansible Salary for Freshers in India.
Basic Ansible Playbook
Make a playbook file (webserver.yml, for example).
Include the following content:
—
– name: Ensure Apache is installed and running
hosts: webservers
become: true # For privilege escalation (sudo)
tasks:
– name: Install Apache
ansible.builtin.package:
name: apache2
state: present
– name: Start Apache
ansible.builtin.service:
name: apache2
state: started
enabled: true
Explanation:
- —: Denotes that a YAML document has begun.
- name: An evocative term for the work or playbook.
- hosts: Indicates which hosts are the target (from the inventory).
- become: true: Permits privilege escalation, allowing tasks to be executed as root.
- tasks: A list of things that need to be done.
- ansible.builtin.package: Installs software by using the package module.
- ansible.builtin.service: Manages services using the service module.
- state: present: Verifies the installation of the package.
- state: started: Verifies the operation of the service.
- enabled: true: Assures that the service launches upon bootup.
Running the Playbook
Use the ansible-playbook command:
ansible-playbook -i inventory.ini webserver.yml
The inventory file is specified by the -i option.
Checking Connectivity
You can check connectivity to your managed nodes prior to executing a playbook:
ansible -i inventory.ini all -m ping
This determines whether the hosts are reachable by using the ping program.
Example Playbook
This is a straightforward strategy for setting up and launching Apache on target hosts:
– hosts: webservers
become: yes
tasks:
– name: Ensure Apache is installed
apt:
name: apache2
state: present
– name: Ensure Apache is running
service:
name: apache2
state: started
Suggested: DevOps training in Chennai.
Key Modules of Ansible
Numerous modules offered by Ansible act as the fundamental units for automation tasks. These modules are made to carry out particular tasks, such handling files, packages, services, users, and more. Ansible’s main modules are listed below, arranged according to their functions:
Package Management Modules
Target systems’ software packages are managed by the following modules:
| Module Name | Description |
| apt | It manages packages on Debian/Ubuntu systems. |
| yum | It manages packages on Red Hat/CentOS systems. |
| dnf | It manages packages on Fedora and newer Red Hat-based systems. |
| pacman | It manages packages on Arch Linux systems. |
| pip | It manages Python packages using pip. |
| homebrew | It manages packages on macOS using Homebrew. |
Example:
– name: Install Apache on Ubuntu
apt:
name: apache2
state: present
File Management Modules
File and directory operations are managed by the following modules:
| Module Name | Description |
| copy | It copies files to the target hosts from the control computer. |
| file | It controls folders, permissions, and file properties. |
| lineinfile | It adds, changes, or eliminates lines from a file. |
| blockinfile | It adds, modifies, or deletes a text block from a file. |
| template | It renders and distributes a Jinja2 template to the intended hosts. |
| find | It looks through the target hosts for files or directories. |
Example:
– name: Ensure a file exists with specific content
copy:
dest: /etc/example.conf
content: “This is a sample configuration file.”
Service Management Modules
System services are managed by the following modules.
| Module Name | Description |
| service | It controls the start, halt, restart, enable, and deactivate of services. |
| systemd | It uses systemd, which is a component of contemporary Linux distributions, to manage services. |
Example:
– name: Ensure Apache is running and enabled
service:
name: apache2
state: started
enabled: yes
User and Group Management Modules
On target systems, these modules control users and groups.
| Module Name | Description |
| user | It manages user accounts. |
| group | It controls groups. |
Example:
– name: Create a user
user:
name: john
state: present
shell: /bin/bash
Cloud Modules
These modules communicate with cloud computing systems.
| Module Name | Description |
| ec2 | It oversees EC2 instances on AWS. |
| azure_rm | It manages Microsoft Azure resources. |
| gcp | It manages GCP resources. |
| docker | It oversees Docker containers and images. |
Example:
– name: Launch an EC2 instance
ec2:
key_name: mykey
instance_type: t2.micro
image: ami-0abcdef1234567890
count: 1
region: us-east-1
Network Modules
These modules control network setups and devices.
| Module Name | Description |
| ios_config | It controls Cisco IOS settings. |
| nxos_config | It oversees the Cisco NX-OS setups. |
| vyos_config | It controls VyOS settings. |
| junos_config | It oversees Juniper Junos setups. |
Example:
– name: Configure a Cisco IOS device
ios_config:
lines:
– interface GigabitEthernet0/1
– ip address 192.168.1.1 255.255.255.0
System and Command Modules
These modules oversee system-level operations and carry out directives.
| Module Name | Description |
| command | It carries out commands on the intended hosts. |
| shell | It carries out commands on the target hosts in a shell. |
| cron | It oversees cron jobs. |
| mount | It mounts files on the filesystem. |
| reboot | The target hosts are restarted. |
Example:
– name: Run a shell command
shell: echo “Hello, World!” >> /tmp/hello.txt
Database Modules
These modules communicate with databases.
| Module Name | Description |
| mysql_db | It oversees MySQL databases. |
| postgresql_db | It oversees databases running PostgreSQL. |
| mongodb | It oversees MongoDB systems. |
Example:
– name: Create a MySQL database
mysql_db:
name: mydb
state: present
Notification Modules
These modules issue warnings or notifications.
| Module Name | Description |
| slack | It sends notifications to Slack. |
| It sends emails. |
Example:
– name: Send a Slack notification
slack:
token: “xoxb-1234567890”
msg: “Deployment completed successfully!”
Advanced Modules
These modules offer advanced features.
| Module Name | Description |
| uri | It interacts with web services (HTTP/HTTPS). |
| wait_for | It pauses until a condition is met, such port availability. |
| debug | During playbook execution, debug information is printed. |
Example:
– name: Wait for a web server to start
wait_for:
port: 80
timeout: 60
Listing all modules: ansible-doc -l
View Module Documentation: ansible-doc <module_name>
Example:
ansible-doc apt
Ansible is a strong tool for automating a variety of operations because of its large library of modules.
Suggested: DevOps interview questions and answers.
Variables and Roles of Ansible
Variables
Variables can be defined in your playbooks or inventory.
Example in Inventory:
Ini, TOML
[webservers]
web1 ansible_host=192.168.1.10 apache_port=8080
Example in playbook:
YAML
– name: Configure Apache port
hosts: webservers
become: true
tasks:
– name: Modify Apache port
ansible.builtin.lineinfile:
path: /etc/apache2/ports.conf
regexp: ‘^Listen ‘
line: “Listen {{ apache_port }}”
notify: restart_apache
handlers:
– name: restart_apache
ansible.builtin.service:
name: apache2
state: restarted
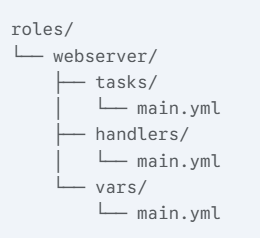
Roles
Playbooks and related files are arranged according to roles.
- Make a roles directory with the command mkdir roles.
- Make a role directory inside the roles directory by running mkdir roles/webserver.
- Make directories like tasks, handlers, vars, templates, etc. inside the role directory.
Example:
The role can then be included in your playbook in the following manner:
—
– name: configure webservers
hosts: webservers
become: true
roles:
– webserver
Ansible Best Practices
Following best practices is essential when using Ansible to create secure, dependable, and maintainable automation. Key Ansible best practices are as follows:
- Use a version control system like Git to keep track of all your Ansible playbooks, roles, inventory files, and variable files.
- Follow organized structure to give your Ansible projects a logical and consistent directory structure.
Example:
playbooks/
roles/
inventory/
group_vars/
host_vars/
- To divide your automation tasks into reusable parts, use Ansible roles. Roles encourage organization and modularity.
- Use variables effectively and make use of descriptive and unambiguous variable names. This makes the playbook much easier to read.
- Never keep private information in plain text, such as API keys or passwords. To encrypt sensitive information, use Ansible Vault.
- Idempotence, or the ability to execute repeatedly without altering the system state beyond the desired result, is a need for Ansible tasks.
- Keep playbooks simple, use descriptive task names, use tags to categorize tasks, and use handlers for tasks in playbook and task design.
- For effective inventory management, use dynamic inventories for automated updates and use separate inventory files for development.
- For testing, use Ansible Lint, use Ansible’s check mode, and use Molecule to test roles.
- To clarify the function and purpose of your roles and playbooks, use comments.
- Instead of using shell commands, use Ansible’s built-in modules whenever you can.
You can build dependable, maintainable, and secure Ansible automation by adhering to these best practices.
Related Training: Docker Training in Chennai.
Importance of Learning Ansible
In today’s IT environment, where automation is becoming more and more important, learning Ansible is quite beneficial. This is a summary of its significance:
- Increased Efficiency and Productivity: Automation of Repetitive Tasks and Faster Deployments.
- Enhanced Dependability and Consistency: Management of Configurations and Idempotency.
- Increased Flexibility and Scalability: Versatile Automation and Scalable Infrastructure Management.
- IT Operations Made Simpler: Human-Readable Language and Agentless Architecture.
- Cloud Integration with DevOps: Cloud Automation and DevOps Workflows.
- Professional Growth: In the IT sector, Ansible skills are highly sought after, making them an invaluable tool for professional growth.
- Broad Applicability: Numerous businesses and industries use Ansible, offering a wide range of job options.
Ansible is an essential talent in the contemporary IT world since it essentially enables IT professionals to increase reliability, optimize processes, and boost efficiency.
Explore all software courses to kickstart your IT career.
Conclusion
This Ansible tutorial has given you a basic understanding of how to use this effective automation technology. The fundamental concepts have been discussed, including installation, inventory control, the creation of simple playbooks, and the significance of roles and variables. Gain expertise with the DevOps process through our Ansible training in Chennai.