In general, when we talk about “advanced Java concepts,” we’re going beyond the foundations of basic Java and into areas that allow for the creation of more intricate and reliable applications. Keeping abreast of the most recent versions and technologies is essential since the Java ecosystem is always changing. Writing Java code that is scalable and maintainable requires an understanding of design patterns. Here is the comprehensive advanced Java tutorial to help you master Java app development. Explore our advanced Java course syllabus.
Advanced Java Contents
Learn Java basics to advance with this following in this advanced Java tutorial:
- Multithreading and Concurrency
- Java Database Connectivity (JDBC)
- Java Servlets and JavaServer Pages (JSP)
- Advanced Java Networking
- Advanced Collection Framework in Java
- Advanced Exception Handling
- Advanced I/O Concepts in Java
- Java Messaging Service (JMS)
Multithreading and Concurrency
Important Java programming principles like concurrency and multithreading enable the execution of numerous activities at once, creating systems that are more responsive and efficient. To enhance application performance, this entails concurrently managing many threads of execution. Thread synchronization, thread pools, and resolving concurrency problems like deadlocks are important subjects.
Multithreading in Java
The ability of a CPU, or a single core of a multi-core processor, to support many threads of execution at once is known as multithreading. The two main ways to accomplish multithreading in Java are either implementing the Runnable interface or by extending the Thread class.
Thread Class
- A Java program’s thread of execution is represented by the Thread class.
- You can override the run() method and extend the Thread class to create a new thread.
- The thread’s execution is started using the start() method, which then invokes the run() method.
Example:
class MyThread extends Thread {
public void run() {
System.out.println(“Thread is running”);
}
public static void main(String[] args) {
MyThread t = new MyThread();
t.start(); // Start the thread
}
}
Runnable Interface
The Runnable interface can also be implemented and sent to a Thread object.
Example:
class MyRunnable implements Runnable {
public void run() {
System.out.println(“Runnable is running”);
}
public static void main(String[] args) {
MyRunnable myRunnable = new MyRunnable();
Thread t = new Thread(myRunnable);
t.start(); // Start the thread
}
}
Since a class can implement more than one interface but can only extend one class, this is more adaptable than extending the Thread class.
Thread Lifecycle
Java threads move through a number of states over their lifetime:
- New: When a thread is generated but not yet started, it is in this condition.
- Runnable: The thread enters the runnable state upon using the start() method. This only indicates that it is prepared to execute, not that it is doing so right now.
- Blocked: When a thread waits for a resource or lock that is being held by another thread, it goes into the blocked state.
- Waiting: By invoking functions like wait() or join(), a thread can go into a waiting state.
- Timed Waiting: If a thread uses join(long millis) or sleep() to wait for a certain amount of time, it is in this state.
- Terminated: When a thread finishes running or is stopped by an exception, it enters this state.
Thread Synchronization
If several threads are altering shared resources at the same time, multithreading may result in race situations. Synchronization can be used on crucial code segments to avoid this.
Example:
class Counter {
private int count = 0;
public synchronized void increment() {
count++;
}
public synchronized int getCount() {
return count;
}
}
Only one thread at a time can access the method thanks to the synchronized keyword.
Concurrency in Java
A more general definition of concurrency is the ability to do several tasks in parallel or overlap, even if not at the same time. It entails overseeing several threads and making sure shared resources run smoothly.
Executor Framework
The higher-level alternative to manually managing threads is the Executor framework, which was introduced in Java 5.
Task lifecycle management is done through the ExecutorService interface. By separating task submission from the specifics of how each work will be carried out, it streamlines thread management.
Example:
import java.util.concurrent.*;
class MyTask implements Runnable {
public void run() {
System.out.println(“Task is running”);
}
public static void main(String[] args) {
ExecutorService executorService = Executors.newFixedThreadPool(2);
executorService.submit(new MyTask());
executorService.submit(new MyTask());
executorService.shutdown();
}
}
Here, you don’t have to manually manage individual Thread objects because the ExecutorService handles thread execution.
Fork/Join Framework
Tasks that can be divided into smaller subtasks and completed in parallel are aided by the Fork/Join Framework, which was first introduced in Java 7.
It makes use of work-stealing, which allows threads to “steal” jobs from other threads when they’re finished with their work in order to maximize CPU utilization.
Example:
import java.util.concurrent.*;
public class ForkJoinExample extends RecursiveTask<Integer> {
private int n;
public ForkJoinExample(int n) {
this.n = n;
}
@Override
protected Integer compute() {
if (n <= 1) {
return 1;
} else {
ForkJoinExample task1 = new ForkJoinExample(n – 1);
task1.fork(); // Start the task asynchronously
return n * task1.join(); // Wait for the result and combine
}
}
public static void main(String[] args) {
ForkJoinPool pool = new ForkJoinPool();
ForkJoinExample task = new ForkJoinExample(5);
System.out.println(pool.invoke(task)); // Should compute factorial of 5
}
}
Concurrent Collections
To provide thread-safe operations on collections without requiring explicit synchronization, Java offers special concurrent collections in the java.util.concurrent package, such as ConcurrentHashMap, CopyOnWriteArrayList, etc.
Example:
import java.util.concurrent.*;
public class ConcurrentMapExample {
public static void main(String[] args) {
ConcurrentMap<String, String> map = new ConcurrentHashMap<>();
map.put(“key1”, “value1”);
map.put(“key2”, “value2”);
System.out.println(map.get(“key1”)); // Thread-safe access
}
}
Semaphores and Locks
Java has locks and semaphores for sophisticated concurrency control.
- Compared to synchronized blocks, locks offer more precise control over synchronization.
- Semaphores are useful for controlling access to and managing a small collection of resources.
Example:
import java.util.concurrent.locks.*;
class Counter {
private int count = 0;
private ReentrantLock lock = new ReentrantLock();
public void increment() {
lock.lock(); // Acquire the lock
try {
count++;
} finally {
lock.unlock(); // Release the lock
}
}
public int getCount() {
return count;
}
}
Key Differences Between Concurrency and Multithreading
Multithreading: The idea of running numerous threads at once, sometimes even within the same process, is known as multithreading.
Concurrency: Managing several activities by alternating between them, possibly through multithreading or other strategies like event-driven programming or time-sharing in a single thread, is known as concurrency.
Recommended: Core Java Course in Chennai.
Java Database Connectivity – JDBC in Advanced Java
A Java API called Java Database Connectivity (JDBC) enables Java apps to communicate with relational databases. For connecting to and communicating with databases, running SQL queries, and processing the outcomes, it offers a standardized interface.
SQL Server, MySQL, PostgreSQL, Oracle, and many other databases can be accessed with JDBC, which is a component of the Java Standard Edition (SE).
Primary Components of JDBC
JDBC is made up of several key components:
- Driver Manager: Database drivers are managed via the Driver Manager. The relevant database driver is loaded and connected by the driver management.
- Driver: A driver is a particular implementation that interacts with a given database. Every database, such as Oracle, MySQL, and others, has a unique JDBC driver.
- Connection: A session that exists between the database and the application. The connection to the database is established and maintained using this object.
- Statement: For running SQL queries. In JDBC, there are three different kinds of statements:
- Statement: To carry out basic SQL queries.
- PreparedStatement: To improve performance and guard against SQL injection attacks, this statement runs precompiled SQL queries.
- CallableStatement: For carrying out database-stored operations.
- ResultSet: Denotes a query’s result set. It enables you to view and work with the information that a database query returns.
- SQLException: An exception class that manages SQL errors is called SQLException.
Steps to Connect to a Database Using JDBC
Step 1: Load the JDBC Driver: The JDBC driver class must be loaded first. Class.forName() is typically used for this stage.
Example:
Class.forName(“com.mysql.cj.jdbc.Driver”);
Step 2: Establish a Connection: You must use the DriverManager class to create a connection to the database after loading the driver.
Example:
Connection conn = DriverManager.getConnection(“jdbc:mysql://localhost:3306/mydatabase”, “username”, “password”);
Step 3: Create a Statement Object: You require a Statement, PreparedStatement, or CallableStatement object in order to run SQL queries.
Example:
Statement stmt = conn.createStatement();
Step 4: Execute SQL Queries: SQL query execution is possible with executeQuery() (for SELECT queries) or executeUpdate() (for INSERT, UPDATE, and DELETE queries) after you have a statement object.
Example: SELECT Query
ResultSet rs = stmt.executeQuery(“SELECT * FROM users”);
Example: INSERT query:
int rowsAffected = stmt.executeUpdate(“INSERT INTO users (name, email) VALUES (‘John’, ‘john@example.com’)”);
Step 5: Process the Results:
The ResultSet object is where you will obtain the results for SELECT queries.
Example:
while (rs.next()) {
String name = rs.getString(“name”);
String email = rs.getString(“email”);
System.out.println(name + “: ” + email);
}
Step 6: Close Resources: To prevent resource leaks, always close the database’s connections, statements, and result sets.
Example:
rs.close();
stmt.close();
conn.close();
Complete JDBC Code
This is a comprehensive illustration of a simple JDBC program that establishes a connection to a MySQL database, runs a query, and handles its result:
import java.sql.*;
public class JdbcExample {
public static void main(String[] args) {
// JDBC URL, username, and password for MySQL database
String url = “jdbc:mysql://localhost:3306/mydatabase”;
String username = “root”;
String password = “password”;
// Establish connection, execute query, and handle exceptions
try {
// Step 1: Load JDBC Driver
Class.forName(“com.mysql.cj.jdbc.Driver”);
// Step 2: Establish Connection
Connection conn = DriverManager.getConnection(url, username, password);
// Step 3: Create a Statement
Statement stmt = conn.createStatement();
// Step 4: Execute a Query (SELECT)
String query = “SELECT * FROM users”;
ResultSet rs = stmt.executeQuery(query);
// Step 5: Process the Result Set
while (rs.next()) {
int id = rs.getInt(“id”);
String name = rs.getString(“name”);
String email = rs.getString(“email”);
System.out.println(id + “: ” + name + ” – ” + email);
}
// Step 6: Close Resources
rs.close();
stmt.close();
conn.close();
} catch (ClassNotFoundException | SQLException e) {
e.printStackTrace();
}
}
}
Prepared Statement for Safe SQL Execution
In order to execute SQL statements with arguments and guard against SQL injection attacks, PreparedStatement is utilized.
Example:
String sql = “INSERT INTO users (name, email) VALUES (?, ?)”;
PreparedStatement pstmt = conn.prepareStatement(sql);
pstmt.setString(1, “Jane”);
pstmt.setString(2, “jane@example.com”);
int rowsAffected = pstmt.executeUpdate();
Transaction Management in JDBC
Transaction management is another feature that JDBC supports. By turning off auto-commit mode and utilizing commit() and rollback(), you may manually manage transactions.
try {
conn.setAutoCommit(false); // Disable auto-commit
Statement stmt = conn.createStatement();
stmt.executeUpdate(“INSERT INTO users (name, email) VALUES (‘Alice’, ‘alice@example.com’)”);
stmt.executeUpdate(“INSERT INTO users (name, email) VALUES (‘Bob’, ‘bob@example.com’)”);
conn.commit(); // Commit the transaction
} catch (SQLException e) {
conn.rollback(); // Rollback in case of error
e.printStackTrace();
} finally {
conn.setAutoCommit(true); // Enable auto-commit back
}
Types of JDBC Drivers
There are four categories of JDBC drivers:
- Type-1 Driver (JDBC-ODBC Bridge Driver): It connects to the database using ODBC. no longer in use and deprecated.
- Type-2 Driver (Native-API Driver): Connects to the database via native database client libraries.
- Type-3 Driver (Network Protocol Driver): Communicates via a middleware server.
- Type-4 Driver (Thin Driver): The most popular and advised type of driver is the Type-4 (Thin Driver), which is a pure Java driver that connects to the database directly over a protocol unique to the database.
JDBC URL Format
Depending on the database type, the JDBC URL format varies. Here are few examples:
- MySQL: jdbc:mysql://<hostname>:<port>/<dbname>
- PostgreSQL: jdbc:postgresql://<hostname>:<port>/<dbname>
- Oracle: jdbc:oracle:thin:@<hostname>:<port>:<dbname>
Enhance your skills with our J2EE Training in Chennai.
Java Servlets and JavaServer Pages
Both JavaServer Pages (JSP) and JavaServlets are technologies used to create dynamic web applications in Java. They let programmers design web pages that handle user input, communicate with databases, and produce dynamic content according to business logic.
Although they both aim to create dynamic content for a web application, their methods and approaches to content rendering are different.
Java Servlets
Java classes known as servlets are responsible for processing HTTP requests and producing HTTP responses. They are employed in the development of server-side applications within web containers, such as Jetty or Apache Tomcat.
Working on the Java EE (now Jakarta EE) platform, a servlet is usually used to handle requests, process them, and then generate dynamic content that is given to the client in the form of HTML, JSON, XML, etc.
How Java Servlets Work:
- Client Request: The server (web server like Tomcat or Jetty) receives an HTTP request from a client (such as a web browser).
- Servlet Container: Using the URL pattern, the web server (or servlet container) receives the request and forwards it to the relevant servlet.
- Servlet Processing: The request is processed by the servlet (for instance, by executing business logic or gaining access to a database).
- Generate Response: The servlet creates and returns to the client the suitable response (HTML, JSON, etc.).
Servlet Lifecycle
The following stages are part of a servlet’s life cycle:
- Loading and Instantiation: The servlet class is loaded into memory and an instance of it is created by the servlet container.
- Initialization: To carry out any required initialization, the container invokes the servlet’s init() method.
- Request Handling: Every client request is handled by using the service() function. This approach creates a response after processing the request.
- Destruction: The container uses the destroy() method to clear off resources when the servlet is no longer required.
Example:
Here is a basic example of a servlet that, when contacted by a client, returns “Hello, World!”:
import java.io.*;
import javax.servlet.*;
import javax.servlet.http.*;
public class HelloWorldServlet extends HttpServlet {
// The service method processes the request and response
protected void doGet(HttpServletRequest request, HttpServletResponse response) throws ServletException, IOException {
// Set the content type to be HTML
response.setContentType(“text/html”);
// Write the response
PrintWriter out = response.getWriter();
out.println(“<html><body>”);
out.println(“<h1>Hello, World!</h1>”);
out.println(“</body></html>”);
}
}
The doGet() method handles GET requests in this example and outputs a straightforward HTML response.
Deployment
- Usually, a servlet container such as Apache Tomcat is used to deploy the servlet.
- The servlet is mapped to a URL pattern using the deployment descriptor (web.xml).
Example: web.xml
<web-app>
<servlet>
<servlet-name>HelloWorldServlet</servlet-name>
<servlet-class>HelloWorldServlet</servlet-class>
</servlet>
<servlet-mapping>
<servlet-name>HelloWorldServlet</servlet-name>
<url-pattern>/hello</url-pattern>
</servlet-mapping>
</web-app>
Advantages of Servlets:
- Performance: Because servlets operate in memory, they are more effective than CGI.
- Scalability: The ability to manage several requests at once.
- Persistence: Following initialization, the servlet object endures throughout several queries.
Related Training: Struts training in Chennai.
JavaServer Pages
One tool that helps in the creation of dynamic, content-driven web pages is JavaServer Pages (JSP). JSP makes it easier to create dynamic online content by enabling the direct insertion of Java code into HTML through specific elements.
JSP functions by compiling the JSP page into a servlet at runtime and is a component of the Java EE (formerly Jakarta EE) platform. To produce a dynamic response, the built servlet is then run just like any other servlet.
How JSP Operates:
- Client Request: The web server (such as Apache Tomcat) receives an HTTP request from a client.
- JSP Page Compilation: If the JSP page has changed or has never been compiled previously, it is compiled into a servlet.
- Servlet Execution: After processing the request, the servlet (which was created from the JSP page) produces dynamic content.
- Response Generation: The client receives the dynamic material, such as HTML, from the servlet.
JSP Lifecycle
Although a JSP page and a servlet have similar life cycles, the JSP container immediately transforms a JSP page into a servlet:
- Translation: If the JSP page has not been compiled, it is converted into a servlet.
- Initialization: Similar to init() for servlets, the jspInit() method is invoked.
- Request Handling: Every request is handled by calling the service() function.
- Destruction: When a JSP page is destroyed, the jspDestroy() function is invoked.
Example: JSP
<%@ page language=”java” contentType=”text/html; charset=ISO-8859-1″ pageEncoding=”ISO-8859-1″%>
<html>
<body>
<h1>Hello, World!</h1>
</body>
</html>
JSP Tags
Here are popular JSP tags:
| Tag Name | Description | Example |
| Scriptlet | It embeds Java code directly in the page. | <% int x = 10; %> |
| Expression | It gives the customer a direct output of a Java expression. | <%= “The value of x is: ” + x %> |
| Declaration | Variables or methods used within the JSP page are declared in this section. | <%! int add(int a, int b) { return a + b; } %> |
| Directives | It is used to provide page-level configuration. | <%@ page contentType=”text/html” %> |
| Action Tag | It is used to initiate specific activities, such as forwarding requests or adding another page. | <jsp:include page=”header.jsp” /> |
Advantages of JSP
- Separation of Concerns: JSP improves maintainability by enabling the separation of presentation logic (in JSP) from business logic (in servlets).
- Usability: Using HTML and Java together makes it simpler to design and manage dynamic pages.
- Automatic Compilation: When a client requests it, JSP pages are automatically compiled into servlets.
Related Training: Hibernate training in Chennai.
Java Networking Concepts
Java has a wide range of networking classes and APIs. Web servers, clients, and file-sharing apps are just a few examples of the kinds of applications that developers can construct with Java networking.
The java.net package includes the Java Networking API, which offers the ability to create peer-to-peer and client-server communication over local networks or the internet.
Key Concepts in Java Networking
- IP Address: Each device on a network is uniquely identified by its IP address. There are two types of IP addresses: IPv4 (192.168.0.1) and IPv6 (2001:0db8:85a3:0000:0000:8a2e:0370:7334).
- Port Number: A port, such as port 80 for HTTP, is an endpoint in a communication that is used to identify a particular process or service that is operating on a host.
- Socket: An endpoint for communication between two machines is called a socket. Client-side and server-side communication are both possible using sockets.
- Protocol: A protocol establishes the rules for data transmission across a network. Common protocols include User Datagram Protocol (UDP) for speedier, less dependable communication and Transmission Control Protocol (TCP) for dependable communication.
Primary Classes in Java Networking
To manage networking duties, Java offers a number of classes in the java.net package:
InetAddress: This class offers methods to resolve domain names and retrieve IP addresses, and it represents a host’s IP address (IPv4 or IPv6).
Example:
InetAddress ip = InetAddress.getByName(“www.google.com”);
System.out.println(ip.getHostAddress());
Socket: The Socket class offers the TCP client-side communication implementation. It uses a port and IP address to link the client and server.
ServerSocket: The server can listen for incoming client connections thanks to the ServerSocket class. It awaits a connection request from clients.
URL: To represent a URL and communicate with web resources, such as websites and APIs, use the URL class.
DatagramSocket: The classes DatagramSocket and DatagramPacket are used for UDP communication, which is quicker than TCP and connectionless, but delivery is not guaranteed.
TCP Client-Server Example (using Socket and Server Socket)
Server-side Code (TCP Server)
A server uses a Server Socket to wait for incoming client connections, and a Socket to accept the connection in response.
Example:
import java.io.*;
import java.net.*;
public class TCPServer {
public static void main(String[] args) {
try {
// Create a server socket to listen on port 1234
ServerSocket serverSocket = new ServerSocket(1234);
System.out.println(“Server is waiting for client connection…”);
// Accept a client connection
Socket clientSocket = serverSocket.accept();
System.out.println(“Client connected”);
// Create input and output streams to communicate with the client
BufferedReader input = new BufferedReader(new InputStreamReader(clientSocket.getInputStream()));
PrintWriter output = new PrintWriter(clientSocket.getOutputStream(), true);
// Read a message from the client
String clientMessage = input.readLine();
System.out.println(“Message from client: ” + clientMessage);
// Send a response to the client
output.println(“Hello from server!”);
// Close the streams and socket
input.close();
output.close();
clientSocket.close();
serverSocket.close();
} catch (IOException e) {
e.printStackTrace();
}
}
}
Client-side Code (TCP Client)
Using the Socket class, the client establishes a connection with the server and transmits and receives messages.
Example:
import java.io.*;
import java.net.*;
public class TCPClient {
public static void main(String[] args) {
try {
// Connect to the server at localhost on port 1234
Socket socket = new Socket(“localhost”, 1234);
// Create input and output streams to communicate with the server
BufferedReader input = new BufferedReader(new InputStreamReader(socket.getInputStream()));
PrintWriter output = new PrintWriter(socket.getOutputStream(), true);
// Send a message to the server
output.println(“Hello from client!”);
// Read the server’s response
String serverMessage = input.readLine();
System.out.println(“Message from server: ” + serverMessage);
// Close the streams and socket
input.close();
output.close();
socket.close();
} catch (IOException e) {
e.printStackTrace();
}
}
}
Explanation: Server:
- A ServerSocket is created by the server to monitor incoming connections.
- The server creates a communication channel using the Socket object and uses the accept() method to accept the connection when a client connects.
- After that, it sends a response after reading the client’s data.
Explanation: Client:
- Using the server’s IP address and port, the client establishes a socket to connect to the server.
- The client waits for a response after sending a message to the server.
- It terminates the connection after getting the message from the server.
Recommended: Advanced Java Interview Questions and Answers.
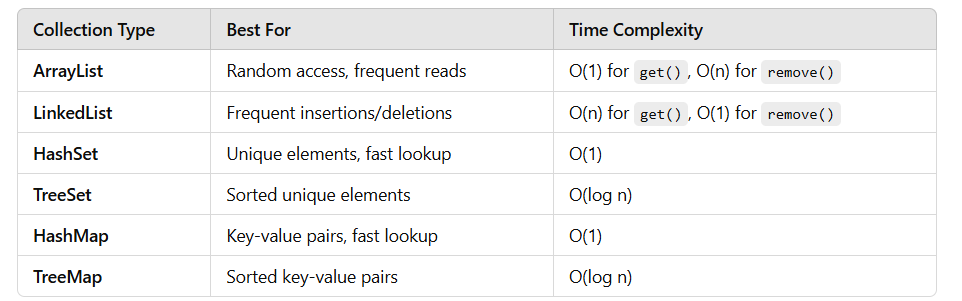
Advanced Collection Framework in Java
The Java Collections Framework (JCF) is a robust Java framework that offers a collection of interfaces, implementations, and algorithms for effectively managing and working with collections of objects. Deep dives into performance considerations, custom implementations, concurrency tools, and best practices are all part of JCF’s advanced subjects.
Advanced Collection Interfaces & Implementations
NavigableMap
NavigableMap<K, V> (Extends SortedMap<K, V>)
Implemented by TreeMap<K, V>
It supports the following navigation methods:
floorKey(), ceilingKey(), lowerKey(), and higherKey()
Example:
NavigableMap<Integer, String> map = new TreeMap<>();
map.put(1, “A”);
map.put(3, “B”);
map.put(5, “C”);
System.out.println(map.higherKey(3)); // Output: 5
NavigableSet
NavigableSet<E> (Extends SortedSet<E>)
Implemented by TreeSet<E>
Range queries and bidirectional iteration are supported.
Example:
NavigableSet<Integer> set = new TreeSet<>();
set.add(10);
set.add(20);
set.add(30);
System.out.println(set.floor(25)); // Output: 20
EnumSet
EnumSet<E extends Enum<E>>
It is the high-performance set for enum types.
Example
enum Color { RED, GREEN, BLUE }
EnumSet<Color> colorSet = EnumSet.of(Color.RED, Color.BLUE);
EnumMap
EnumMap<K extends Enum<K>, V>
Enum-specific map that is internally represented by arrays.
Example:
EnumMap<Color, String> colorMap = new EnumMap<>(Color.class);
colorMap.put(Color.RED, “Danger”);
Enroll in our advanced Java online course.
Performance Considerations in Collections
Custom Comparator in TreeSet and TreeMap
Custom sorting for TreeSet
TreeSet<String> set = new TreeSet<>(Comparator.reverseOrder());
set.add(“Apple”);
set.add(“Banana”);
set.add(“Cherry”);
System.out.println(set); // Output: [Cherry, Banana, Apple]
Custom sorting for TreeMap
TreeMap<Integer, String> map = new TreeMap<>(Comparator.reverseOrder());
map.put(1, “A”);
map.put(2, “B”);
map.put(3, “C”);
System.out.println(map); // Output: {3=C, 2=B, 1=A}
Concurrent Collections
CopyOnWriteArrayList
- A thread-safe substitute for an array list
- Excellent for procedures involving a lot of reading because it generates a new copy upon alterations.
Example:
CopyOnWriteArrayList<Integer> list = new CopyOnWriteArrayList<>();
list.add(10);
list.add(20);
ConcurrentHashMap
- Effective thread-safe substitute for hash maps
- Segment locking is used to enable simultaneous reads and writes.
Example:
ConcurrentHashMap<Integer, String> map = new ConcurrentHashMap<>();
map.put(1, “A”);
map.put(2, “B”);
BlockingQueue (e.g., LinkedBlockingQueue)
In producer-consumer situations, blocking queues (like LinkedBlockingQueue) are utilized.
Example:
BlockingQueue<Integer> queue = new LinkedBlockingQueue<>(5);
queue.put(10);
queue.take();
Streams and Collections
Converting Collections to Streams:
List<String> list = Arrays.asList(“A”, “B”, “C”);
list.stream().forEach(System.out::println);
Collecting Streams to Collections:
Set<Integer> set = list.stream().map(String::length).collect(Collectors.toSet());
Immutable Collections
List.of(), Set.of(), Map.of() create immutable collections:
Example: List<String> list = List.of(“A”, “B”, “C”);
Recommended: Java Interview Questions and Answers.
Advanced Exception Handling in Java
Managing exceptions is essential to creating reliable Java applications. Custom exceptions, multi-catch blocks, suppressed exceptions, exception chaining, and best practices for enhancing program reliability are examples of advanced exception handling approaches.
Custom Exceptions (User-Defined Exceptions)
Creating Custom Checked and Unchecked Exceptions: By extending either Exception (checked) or RuntimeException (unchecked), Java enables the definition of custom exceptions.
Example: Checked Exception (extends Exception)
class InvalidAgeException extends Exception {
public InvalidAgeException(String message) {
super(message);
}
}
public class CustomCheckedExceptionDemo {
static void validateAge(int age) throws InvalidAgeException {
if (age < 18) {
throw new InvalidAgeException(“Age must be 18 or above”);
}
}
public static void main(String[] args) {
try {
validateAge(16);
} catch (InvalidAgeException e) {
System.out.println(“Caught Exception: ” + e.getMessage());
}
}
}
Example: Unchecked Exception (extends RuntimeException)
class InvalidInputException extends RuntimeException {
public InvalidInputException(String message) {
super(message);
}
}
public class CustomUncheckedExceptionDemo {
static void checkInput(String input) {
if (input == null || input.isEmpty()) {
throw new InvalidInputException(“Input cannot be null or empty”);
}
}
public static void main(String[] args) {
checkInput(“”); // Throws exception at runtime
}
}
Multi-Catch Blocks (Java 7+)
Multiple exceptions can now be caught in a single catch block thanks to Java 7.
Example:
public class MultiCatchDemo {
public static void main(String[] args) {
try {
int[] arr = new int[5];
arr[10] = 50; // ArrayIndexOutOfBoundsException
String str = null;
System.out.println(str.length()); // NullPointerException
} catch (ArrayIndexOutOfBoundsException | NullPointerException e) {
System.out.println(“Caught exception: ” + e.getClass().getSimpleName());
}
}
}
Exception Chaining (Cause Tracking)
The root cause of an issue can be attached thanks to exception chaining.
public class ExceptionChainingDemo {
static void method1() {
throw new NullPointerException(“Original Cause”);
}
static void method2() {
try {
method1();
} catch (NullPointerException e) {
throw new RuntimeException(“Wrapping Exception”, e);
}
}
public static void main(String[] args) {
try {
method2();
} catch (RuntimeException e) {
e.printStackTrace(); // Shows cause
}
}
}
Suppressed Exceptions (Try-With-Resources)
Java has the ability to suppress secondary exceptions when try-with-resources is used.
class MyResource implements AutoCloseable {
@Override
public void close() throws Exception {
throw new Exception(“Close Exception”);
}
}
public class SuppressedExceptionDemo {
public static void main(String[] args) {
try (MyResource res = new MyResource()) {
throw new Exception(“Main Exception”);
} catch (Exception e) {
System.out.println(“Caught: ” + e.getMessage());
for (Throwable suppressed : e.getSuppressed()) {
System.out.println(“Suppressed: ” + suppressed.getMessage());
}
}
}
}
Output
Caught: Main Exception
Suppressed: Close Exception
Custom Exception Logging with Stack Trace
Exception logging can be done with logging frameworks such as Log4j or SLF4J by using printStackTrace().
Example:
import java.util.logging.Logger;
public class ExceptionLoggingDemo {
private static final Logger logger = Logger.getLogger(ExceptionLoggingDemo.class.getName());
public static void main(String[] args) {
try {
int result = 10 / 0;
} catch (ArithmeticException e) {
logger.severe(“Exception occurred: ” + e.getMessage());
}
}
}
Advanced I/O Concepts in Java
The java.io, java.nio, and java.nio.file packages in Java offer a comprehensive collection of I/O (Input/Output) APIs. Character encoding, memory-mapped files, buffering, asynchronous file I/O, and effective file management are examples of advanced I/O principles.
Java I/O vs. Java NIO

Buffered Streams (Efficient File Handling)
By lowering the quantity of I/O operations, buffered streams enhance performance.
BufferedReader & BufferedWriter (For Text Files)
import java.io.*;
public class BufferedReaderExample {
public static void main(String[] args) {
try (BufferedReader reader = new BufferedReader(new FileReader(“input.txt”));
BufferedWriter writer = new BufferedWriter(new FileWriter(“output.txt”))) {
String line;
while ((line = reader.readLine()) != null) {
writer.write(line.toUpperCase());
writer.newLine();
}
} catch (IOException e) {
e.printStackTrace(); }
}
}
BufferedInputStream & BufferedOutputStream (For Binary Files)
import java.io.*;
public class BufferedStreamExample {
public static void main(String[] args) {
try (BufferedInputStream in = new BufferedInputStream(new FileInputStream(“image.jpg”));
BufferedOutputStream out = new BufferedOutputStream(new FileOutputStream(“copy.jpg”))) {
byte[] buffer = new byte[1024];
int bytesRead;
while ((bytesRead = in.read(buffer)) != -1) {
out.write(buffer, 0, bytesRead);
}
} catch (IOException e) {
e.printStackTrace();
}
}
}
Character Encoding & Decoding
Using InputStreamReader and OutputStreamWriter to handle various character encodings.
Example:
import java.io.*;
public class EncodingExample {
public static void main(String[] args) {
try (BufferedReader reader = new BufferedReader(new InputStreamReader(new FileInputStream(“text.txt”), “UTF-8”));
BufferedWriter writer = new BufferedWriter(new OutputStreamWriter(new FileOutputStream(“output.txt”), “UTF-16”))) {
String line;
while ((line = reader.readLine()) != null) {
writer.write(line);
writer.newLine();
}
} catch (IOException e) {
e.printStackTrace();
}
}
}
Java NIO (Non-blocking I/O)
Using buffers, channels, and selectors, Java NIO (java.nio) is made for high-performance file and network operations.
FileChannel (Efficient File Handling)
import java.io.*;
import java.nio.*;
import java.nio.channels.*;
public class FileChannelExample {
public static void main(String[] args) {
try (RandomAccessFile file = new RandomAccessFile(“data.txt”, “rw”);
FileChannel channel = file.getChannel()) {
ByteBuffer buffer = ByteBuffer.allocate(1024);
int bytesRead = channel.read(buffer);
while (bytesRead != -1) {
buffer.flip(); // Prepare for reading
while (buffer.hasRemaining()) {
System.out.print((char) buffer.get());
}
buffer.clear();
bytesRead = channel.read(buffer);
}
} catch (IOException e) {
e.printStackTrace();
}
}
}
Memory-Mapped Files (Fastest File I/O)
Performance is enhanced with memory-mapped files, which enable direct file access in memory.
Example:
import java.io.*;
import java.nio.*;
import java.nio.channels.*;
public class MemoryMappedFileExample {
public static void main(String[] args) {
try (RandomAccessFile file = new RandomAccessFile(“largefile.dat”, “rw”);
FileChannel channel = file.getChannel()) {
MappedByteBuffer buffer = channel.map(FileChannel.MapMode.READ_WRITE, 0, channel.size());
while (buffer.hasRemaining()) {
System.out.print((char) buffer.get());
}
buffer.put(0, (byte) ‘H’); // Modify file directly in memory
} catch (IOException e) {
e.printStackTrace();
}
}
}
Suggested: J2EE interview questions and answers.
Asynchronous File I/O (Java NIO.2)
AsynchronousFileChannel, a non-blocking file action, first introduced in Java 7.
import java.io.IOException;
import java.nio.ByteBuffer;
import java.nio.channels.AsynchronousFileChannel;
import java.nio.file.*;
public class AsyncFileRead {
public static void main(String[] args) throws IOException {
Path path = Paths.get(“example.txt”);
AsynchronousFileChannel channel = AsynchronousFileChannel.open(path);
ByteBuffer buffer = ByteBuffer.allocate(1024);
channel.read(buffer, 0, buffer, new CompletionHandler<Integer, ByteBuffer>() {
@Override
public void completed(Integer result, ByteBuffer buffer) {
buffer.flip();
while (buffer.hasRemaining()) {
System.out.print((char) buffer.get());
}
}
@Override
public void failed(Throwable exc, ByteBuffer buffer) {
System.err.println(“Failed: ” + exc.getMessage());
}
});
}
}
Serialization & Deserialization
Object Serialization
Example:
import java.io.*;
class Person implements Serializable {
private static final long serialVersionUID = 1L;
String name;
int age;
public Person(String name, int age) {
this.name = name;
this.age = age;
}
}
public class SerializationExample {
public static void main(String[] args) {
try (ObjectOutputStream out = new ObjectOutputStream(new FileOutputStream(“person.ser”))) {
Person p = new Person(“Alice”, 30);
out.writeObject(p);
} catch (IOException e) {
e.printStackTrace();
}
}
}
Object Deserialization
public class DeserializationExample {
public static void main(String[] args) {
try (ObjectInputStream in = new ObjectInputStream(new FileInputStream(“person.ser”))) {
Person p = (Person) in.readObject();
System.out.println(“Name: ” + p.name + “, Age: ” + p.age);
} catch (IOException | ClassNotFoundException e) {
e.printStackTrace();
}
}
}
Best Practices for Advanced I/O
- For performance, use buffering (BufferedReader, BufferedWriter).
- For small files, use the Files API (java.nio.file.Files.readAllLines()).
- For processing huge files, use Memory-Mapped Files.
- When doing non-blocking I/O, use AsynchronousFileChannel.
- Only use Serializable when absolutely required; for storage, think about using JSON or XML.
- Try-with-resources should always be used to close streams.
Accelerate your career with our Java full-stack job seeker program.
Java Messaging Services
Applications can create, send, receive, and read messages asynchronously with the help of the Java Messaging Service (JMS) API. It is an essential component of enterprise systems that require asynchronous, loosely linked, and dependable communication.
JMS Architecture & Components
JMS uses a message provider, such as ActiveMQ, RabbitMQ, or IBM MQ, and operates on a publish-subscribe or point-to-point paradigm.
JMS Components
Here are the popular JMS components:
- JMS Provider: The messaging system (such as IBM MQ or ActiveMQ).
- JMS Client: Applications that send or receive messages are known as JMS Clients.
- JMS Messages: Data transmitted between apps is known as JMS messages.
- JMS Destinations:
- Queue (Point-to-Point) → One sender, one receiver.
- Topic (Publish-Subscribe) → One sender, multiple subscribers.
- JMS Connection Factory: It is a connection-making factory.
- JMS Session: Used to generate producers, consumers, and messages.
JMS Messaging Models
A) Point-to-Point (P2P) Model (Queue-Based Messaging):
- A message is sent from a queue to a single recipient.
- The sender does not have to be aware of the recipient.
Example:
import javax.jms.*;
import org.apache.activemq.ActiveMQConnectionFactory;
public class QueueSender {
public static void main(String[] args) throws JMSException {
ConnectionFactory factory = new ActiveMQConnectionFactory(“tcp://localhost:61616”);
Connection connection = factory.createConnection();
connection.start();
Session session = connection.createSession(false, Session.AUTO_ACKNOWLEDGE);
Queue queue = session.createQueue(“MyQueue”);
MessageProducer producer = session.createProducer(queue);
TextMessage message = session.createTextMessage(“Hello JMS Queue!”);
producer.send(message);
System.out.println(“Message sent to queue.”);
connection.close();
}
}
Receiver (Consumer):
public class QueueReceiver {
public static void main(String[] args) throws JMSException {ConnectionFactory factory = new ActiveMQConnectionFactory(“tcp://localhost:61616”);
Connection connection = factory.createConnection();
connection.start();
Session session = connection.createSession(false, Session.AUTO_ACKNOWLEDGE);
Queue queue = session.createQueue(“MyQueue”);
MessageConsumer consumer = session.createConsumer(queue);
TextMessage message = (TextMessage) consumer.receive();
System.out.println(“Received: ” + message.getText());
connection.close();
}
}
Publish-Subscribe (Pub-Sub) Model (Topic-Based Messaging):
- The identical message is sent to several subscribers.
- Messages are sent to loyal subscribers even if they are unplugged.
Example:
public class TopicPublisher {
public static void main(String[] args) throws JMSException { ConnectionFactory factory = new ActiveMQConnectionFactory(“tcp://localhost:61616”);
Connection connection = factory.createConnection();
connection.start();
Session session = connection.createSession(false, Session.AUTO_ACKNOWLEDGE);
Topic topic = session.createTopic(“MyTopic”);
MessageProducer producer = session.createProducer(topic);
TextMessage message = session.createTextMessage(“Hello JMS Topic!”);
producer.send(message);
System.out.println(“Message published to topic.”);
connection.close();
}
}
Subscriber (Consumer):
public class TopicSubscriber {
public static void main(String[] args) throws JMSException {ConnectionFactory factory = new ActiveMQConnectionFactory(“tcp://localhost:61616”);
Connection connection = factory.createConnection();
connection.start();
Session session = connection.createSession(false, Session.AUTO_ACKNOWLEDGE);
Topic topic = session.createTopic(“MyTopic”);
MessageConsumer consumer = session.createConsumer(topic);
TextMessage message = (TextMessage) consumer.receive();
System.out.println(“Received: ” + message.getText());
connection.close();
}
}
JMS Message Types
Multiple message types are supported by JMS:
- TextMessage: A plain text message, such as an XML or JSON file.
- ObjectMessage: Java objects that must implement Serializable.
- BytesMessage: Large data in raw bytes.
- StreamMessage: Primitive type stream.
- MapMessage: HashMap-style key-value pairs.
Example:
import java.io.Serializable;
class Employee implements Serializable {
private static final long serialVersionUID = 1L;
String name;
int id;
public Employee(String name, int id) {
this.name = name;
this.id = id;
}
}
public class ObjectMessageSender {
public static void main(String[] args) throws JMSException {
ConnectionFactory factory = new ActiveMQConnectionFactory(“tcp://localhost:61616”);
Connection connection = factory.createConnection();
connection.start();
Session session = connection.createSession(false, Session.AUTO_ACKNOWLEDGE);
Queue queue = session.createQueue(“ObjectQueue”);
MessageProducer producer = session.createProducer(queue);
ObjectMessage message = session.createObjectMessage(new Employee(“John Doe”, 101));
producer.send(message);
System.out.println(“Employee object sent.”);
connection.close();
}
}
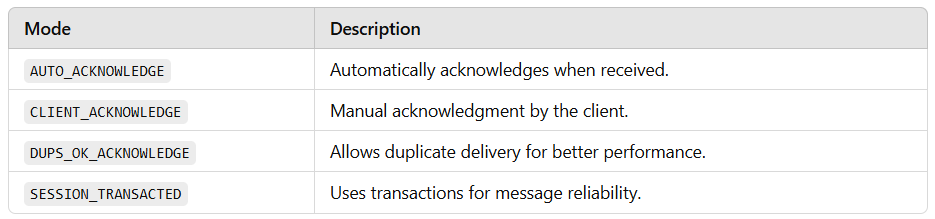
JMS Acknowledgement Modes
JMS offers various methods for confirming the reception of messages:
Example using CLIENT_ACKNOWLEDGE:
MessageConsumer consumer = session.createConsumer(queue);
TextMessage message = (TextMessage) consumer.receive();
System.out.println(“Received: ” + message.getText());
message.acknowledge(); // Manual acknowledgment
JMS Transactions
Atomic messaging is supported by JMS using transactional sessions.
Session session = connection.createSession(true, Session.SESSION_TRANSACTED);
MessageProducer producer = session.createProducer(queue);
TextMessage message1 = session.createTextMessage(“Message 1”);
TextMessage message2 = session.createTextMessage(“Message 2”);
producer.send(message1);
producer.send(message2);
session.commit(); // Ensures both messages are sent successfully
Message Listeners (Asynchronous Consumers)
We can use MessageListener instead of receive().
public class AsyncConsumer {
public static void main(String[] args) throws JMSException { ConnectionFactory factory = new ActiveMQConnectionFactory(“tcp://localhost:61616”);
Connection connection = factory.createConnection();
connection.start();
Session session = connection.createSession(false, Session.AUTO_ACKNOWLEDGE);
Queue queue = session.createQueue(“MyQueue”);
MessageConsumer consumer = session.createConsumer(queue);
consumer.setMessageListener(message -> {
try {
if (message instanceof TextMessage) {
System.out.println(“Async Received: ” + ((TextMessage) message).getText());
}
} catch (JMSException e) {
e.printStackTrace();
}
});
}
}
JMS Security & Best Practices
- For secure messaging, use SSL/TLS (ssl://localhost:61617).
- Employ connection pooling, such as the PooledConnectionFactory feature of Apache ActiveMQ.
- Manage queues of dead letters for communications that cannot be delivered.
- To delete outdated messages, set message expiration (message.setJMSExpiration(60000)).
- Make persistent subscribers possible.
- Use JMX metrics to keep an eye on the JMS broker.
Explore all our software training courses here.
Conclusion
Keeping abreast of the most recent versions and technologies is essential since the Java ecosystem is always changing. Writing Java code that is scalable and maintainable requires an understanding of design patterns. We hope this advanced Java programming tutorial is useful. Gain expertise with our advanced Java training in Chennai.