Python Programming with Tkinter
A software toolkit with a collection of classes that specify the behavior of different GUI elements is called a graphics library. The majority of these graphics libraries are written in C or C++. The Python version of Fredrik Lundh’s Tcl-Tk GUI toolkit is called Tkinter. Standard distributions of Python for all platforms come with this module preinstalled. Learn more about Tkinter at our Python training institute in Chennai.
Basics of GUI: Tkinter
The Tkinter module defines the functionality of the GUI elements. A UI can be created by following the steps shown in the code below.
from tkinter import *
window=Tk()
window.title(‘Hello Python’)
window.geometry(“300×200+10+20”)
window.mainloop()
Importing the TKinter module should come first. Call the Tk() function to set up the application object after import.
This will generate a root window, which is the top-level window, with a control box containing the minimize and close buttons, a client area to accommodate other widgets, and a frame with a title bar.
The width, height, and coordinates of the frame’s upper left corner are defined by the geometry() method as follows (all values are in pixels): “widthxheight+XPOS+YPOS” is the geometry of the window.
The mainloop() function is then called by the application object to initiate an event-listening loop. As of right now, the application is waiting continuously for any events that are generated on its components.
The event could be any text typed into a text field, a choice made from a radio button or drop-down menu, a single or double mouse click, etc.
The functionality of the program entails calling the proper callback routines in reaction to a specific kind of event.
When the close button on the title bar is clicked, the event loop will come to an end.
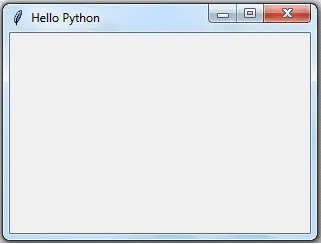
The code above will open the window that follows:
The widget class is the ancestor of all Tkinter widget classes. Now let’s add the most popular widgets. Multithreading in Python is explained here.
Button
The button class can be used to construct the button. The button class constructor requires references to the options and the main window.
Syntax: Button(window, attributes)
The following crucial settings allow you to personalize a button:
text: caption of the button
bg: background colour
fg: foreground colour
font: font name and size
image: to be displayed instead of text
command: function to be called when clicked
Example: Button
from tkinter import *
window=Tk()
btn=Button(window, text=”This is Button widget”, fg=’blue’)
btn.place(x=80, y=100)
window.title(‘Hello Python’)
window.geometry(“300×200+10+10”)
window.mainloop()
Suggested Link: Goto statement in Python
Label
In Python, the Label class can be used to produce a label in the user interface. The label constructor requires the top-level window object and the options parameters. Option arguments are comparable to the object called Button. The window’s label is added by doing the following:
Example: Label
from tkinter import *
window=Tk()
lbl=Label(window, text=”This is Label widget”, fg=’red’, font=(“Helvetica”, 16))
lbl.place(x=60, y=50)
window.title(‘Hello Python’)
window.geometry(“300×200+10+10”)
window.mainloop()
Here, the 16-point Helvetica font will be used to display the label’s caption in red. Explore how method overloading in Python is accomplished using our article.
Entry
This widget renders a single-line text box to take user input. Use the Text widget to enter text in several lines. In addition to the above-stated properties, the constructor of the Entry class allows the following:
bd: the text box’s border size; by default, it is 2 pixels.
show: Set the show property to “*” to turn the text box into a password field.
The text field is added using the code below.
txtfld=Entry(window, text=”This is Entry Widget”, bg=’black’,fg=’white’, bd=5)
The window with a button, label, and entry field is created in the example that follows.
Example: Create Widgets
from tkinter import *
window=Tk()
btn=Button(window, text=”This is Button widget”, fg=’blue’)
btn.place(x=80, y=100)
lbl=Label(window, text=”This is Label widget”, fg=’red’, font=(“Helvetica”, 16))
lbl.place(x=60, y=50)
txtfld=Entry(window, text=”This is Entry Widget”, bd=5)
txtfld.place(x=80, y=150)
window.title(‘Hello Python’)
window.geometry(“300×200+10+10”)
window.mainloop()
The example above will open the window that follows.
Useful Source: Jump Statements in Python
Selection Widgets
Radiobutton: This widget shows a toggle button to turn it on or off. Even though there might be multiple buttons, only one will ever be active at any given moment.
Checkbutton: Another toggle button is the checkbutton. Before its caption, a rectangular check box is displayed. When it is clicked to the OFF position, the tick mark in the box indicates that it is in the ON state.
Combobox: The ttk module of the tkinterpackage defines this class. It fills the values argument of a drop-down menu with data from a collection data type, like a list or tuple.
Listbox: This widget shows the complete set of string elements, in contrast to Combobox. The user has the option to choose one or more items.
The window containing the selection widgets—Radiobutton, Checkbutton, Listbox, and Combobox—is shown in the example that follows:
Example: Selection Widgets
from tkinter import *
from tkinter.ttk import Combobox
window=Tk()
var = StringVar()
var.set(“one”)
data=(“one”, “two”, “three”, “four”)
cb=Combobox(window, values=data)
cb.place(x=60, y=150)
lb=Listbox(window, height=5, selectmode=’multiple’)
for num in data:
lb.insert(END,num)
lb.place(x=250, y=150)
v0=IntVar()
v0.set(1)
r1=Radiobutton(window, text=”male”, variable=v0,value=1)
r2=Radiobutton(window, text=”female”, variable=v0,value=2)
r1.place(x=100,y=50)
r2.place(x=180, y=50)
v1 = IntVar()
v2 = IntVar()
C1 = Checkbutton(window, text = “Cricket”, variable = v1)
C2 = Checkbutton(window, text = “Tennis”, variable = v2)
C1.place(x=100, y=100)
C2.place(x=180, y=100)
window.title(‘Hello Python’)
window.geometry(“400×300+10+10”)
window.mainloop()
Recommended Read: Python Interview Questions and Answers
Event Handling
An event is a notification that the application object gets as a result of user interaction with different GUI widgets. Because it maintains an event listening loop, the application object is constantly expecting events. The user can click or double-click the mouse, push a keyboard key when the cursor is inside a text box, make an element focus or lose focus, and more.
Events are written in the format <modifier-type-qualifier> as strings. Numerous tournaments are only shown as qualifying. The event’s class is defined by its kind. The table below illustrates the many events that Tkinter can identify:
| Event | Modifier | Type | Qualifier | Action |
| <Button-1> | Button | 1 | The left button of the mouse will be clicked | |
| <Button-2> | Button | 2 | The middle button of the mouse will be clicked | |
| <Destroy> | Destroy | Window will be destroyed | ||
| <Double-Button-1> | Double | Button | 1 | Double-click first mouse button 1 |
| <Enter> | Enter | Cursor enters window | ||
| <Expose> | Expose | Window fully or partially exposed. | ||
| <KeyPress-a> | KeyPress | a | Any key has been pressed | |
| <KeyRelease> | KeyRelease | Any key has been released | ||
| <Leave> | Leave | Cursor leaves window | ||
| <Print> | PRINT key has been pressed. | |||
| <FocusIn> | FocusIn | Widget will gain focus | ||
| <FocusOut> | FocusOut | Widget will lose focus. |
An event needs to be associated with one or more of the application’s GUI widgets. If not, it’ll be disregarded. There are two methods in Tkinter for using a widget to register an event. The bind() method is the first method to use, and the command parameter in the widget constructor is the second method.
Bind() Method
By using the bind() method, you may link an event to a callback function, which will be called when the event happens.
Syntax: Widget.bind(event, callback)
For example, use the following code to trigger the MyButtonClicked() function upon a left button click:
Example: Event Binding
from tkinter import *
window=Tk()
btn = Button(window, text=’OK’)
btn.bind(‘<Button-1>’, MyButtonClicked)
Numerous attributes, including the source widget, position coordinates, mouse button number, and event type, define the event object. If necessary, these can be supplied to the callback function.
Command Parameter
Every widget reacts to a specific type in the main. Button, for instance, is the source of the Button event. It is therefore tied to it by default. Many widget classes include constructor methods that take an optional parameter named command. The function that will be called back when its bound event happens is set as the command parameter. Comparing this approach to the bind() method, it is more convenient.
btn = Button(window, text=’OK’, command=myEventHandlerFunction)
The application window in the example below contains two text input fields and an additional field for displaying the outcome. Add and subtract are the captions for two button objects. It is expected of the user to fill in both entry widgets with the number. The third shows their addition or subtraction.
The command argument is used to configure the first button (Add). The class’s add() method is its value. The second button registers the left button click with the sub() procedure by using the bind() technique. Using the Entry widget’s get() method, both approaches read the text fields’ contents, parse the numbers, do addition and subtraction, and then use the insert() method to display the results in the third text field.
Example
from tkinter import *
class MyWindow:
def __init__(self, win):
self.lbl1=Label(win, text=’First number’)
self.lbl2=Label(win, text=’Second number’)
self.lbl3=Label(win, text=’Result’)
self.t1=Entry(bd=3)
self.t2=Entry()
self.t3=Entry()
self.btn1 = Button(win, text=’Add’)
self.btn2=Button(win, text=’Subtract’)
self.lbl1.place(x=100, y=50)
self.t1.place(x=200, y=50)
self.lbl2.place(x=100, y=100)
self.t2.place(x=200, y=100)
self.b1=Button(win, text=’Add’, command=self.add)
self.b2=Button(win, text=’Subtract’)
self.b2.bind(‘<Button-1>’, self.sub)
self.b1.place(x=100, y=150)
self.b2.place(x=200, y=150)
self.lbl3.place(x=100, y=200)
self.t3.place(x=200, y=200)
def add(self):
self.t3.delete(0, ‘end’)
num1=int(self.t1.get())
num2=int(self.t2.get())
result=num1+num2
self.t3.insert(END, str(result))
def sub(self, event):
self.t3.delete(0, ‘end’)
num1=int(self.t1.get())
num2=int(self.t2.get())
result=num1-num2
self.t3.insert(END, str(result))
window=Tk()
mywin=MyWindow(window)
window.title(‘Hello Python’)
window.geometry(“400×300+10+10”)
window.mainloop()
Output
Thus, you can use Python’s TKinter to design the user interface. Learn to build web applications with Django, the popular Python web framework.
Bottom Line
Learn more about Python Tkinter at SLA and build your first application with comprehensive real-world application development experiences. Explore various Python libraries for data analysis, such as Numpy, Pandas, and Matplotlib.